HomeComputingSoftwareNetworking & ServersNAS DS225+ Network storage server 2Bay Private Cloud Storage Built-in 2.5GbE Network port Diskstation RAID
/product/58/8919914/1.jpg?0058)
/product/58/8919914/2.jpg?0058)
/product/58/8919914/3.jpg?0058)
Share this product
Synology NAS DS225+ Network storage server 2Bay Private Cloud Storage Built-in 2.5GbE Network port Diskstation RAID
Brand: Synology | Similar products from Synology
₦ 890,000
1 units left
+ shipping from ₦ 1,000 to LEKKI-AJAH (SANGOTEDO)
0 out of 5
(No ratings available)Promotions
Delivery & Returns
Choose your location
Pickup Station
Delivery Fees ₦ 1,000
Ready for pickup between 02 October and 05 October if you place your order within the next 20hrs 12mins
Door Delivery
Delivery Fees ₦ 1,600
Ready for delivery between 02 October and 05 October if you place your order within the next 20hrs 12mins
Return Policy
Free return within 7 days for ALL eligible itemsDetails
Seller Information
BlackGig
84%Seller Score
408 Followers
Seller Performance
Shipping speed: Good
Quality Score: Good
Customer Rating: Good
Cancellation Rate: Excellent
Product details
Synology DS225+ 2Bay Desktop NAS, Intel Celeron J4125 4-Core CPU, 2.5GbE, 2 * M.2 NVMe Slots, 4K HDMI, Network Attached Storage Diskless
Synology DS225+ Setup
Synology DS225+ NAS memory device is one of the best memory management devices which connects with your router and computer to work. You can upload a ton of files, photos, videos and other storages into its drives. Here in this guide you will get to know about how to complete the Synology DS225+ setup.
This guide includes: Joining all the parts of the device, connection with the router, connecting with the computer via Synology Assistant, & troubleshooting tips for the setup and management. So, let’s dive into this setup quickly and finish the setup.
Synology NAS DS225+ setup
Joint All Parts in Your NAS Device
In the Synology DS225+ NAS box you will find: the NAS unit itself, power brick + cable, two little Ethernet cables, and a baggie with screws.
The front panel just pulls off no screws holding it. Drive bays are tool-less, but you’ll still need those side brackets. Snap them on the drives, slide drives into the slots until they click. SATA connector lines up in the back. Don’t force it, if it feels jammed, you’re misaligned.
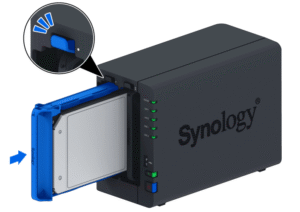
Connect with the Router
Grab a decent ethernet cable (the one it ships with is fine). Plug one end into LAN1 on the back of the NAS, the other into an open port on your router. Doesn’t matter which port, just not the WAN one.
Hit the power button on the front. Give it a minute. The lights will blink, fan kicks in, then it’ll settle with a steady blue/green.
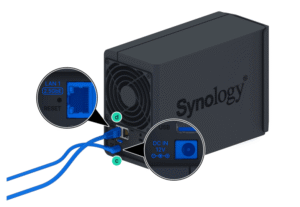
Connect It with Computer via Interface
Link up your computer with the same router network with which your Synology DS225+ setup is connected. Then:
- On your computer, open a browser and type: find.synology.com.
- It’ll scan your LAN and show your NAS. If it doesn’t, grab Synology Assistant from Synology’s download centre.
- When the Web Assistant finds your NAS, it’ll say “Not installed” or “Install DSM.
- Click through, it’ll grab the latest DSM from Synology and install it. Takes 10–15 min.
- Create your admin account and password.
- Then just click the button: SAVE or Apply to finish the setup.
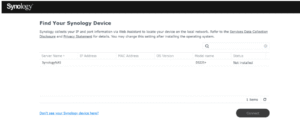
Install DSM through Synology Assistant
- Download it from Synology’s site (they hide it under “utilities” if you’re finding).
- Install it. It’s just a little network scanner app that finds your NAS.
- Open Synology Assistant. It should scan your network automatically. If it doesn’t, hit the refresh button.
- Your DS225+ will show up as “Not Installed” or “DS225+” with a status like that.
- If nothing shows up, check your router’s DHCP to make sure the NAS pulled an IP.
- Right-click the NAS entry, choose Install.
- It’ll ask you where DSM is. Here’s the trick: sometimes it auto-downloads the right .pat file (DSM install package).
- If not, you have to grab it from Synology’s download centre manually.
- The file name will look like DSM_DS225+_xxx.pat. Throw that in.
Troubleshooting Tips: Synology DS225+ Setup
Power + Drive Setup
- Obvious but… check the drives are seated.
- Use Synology’s drive compatibility list. It won’t always reject unsupported drives, but you’ll run into weird SMART warnings later.
Finding the Box on the Network
- Synology Assistant app can be hard to work with. Sometimes it just doesn’t see the NAS.
- What worked: open your router’s admin page, look for the new DHCP lease. That’s your DS225+. Copy the IP and hit it directly in your browser.
- URL looks like: http://<192.168.1.1>:5000
DSM Install
- Once you’re in, it’ll ask to install DSM. Just click “Install” and let it wipe the drives.
- If it hangs, unplug the NAS, wait 30 seconds, and try again. (Yeah, feels wrong, but it works.)
RAID / Storage Pool
- If you’ve got 2 drives and just want redundancy, pick SHR.
- If you want max space and don’t care about a drive, go Basic or RAID 0.
- It can take forever to “verify” — like hours. Just let it run in the background.
Account + QuickConnect
- Make a loc admin user too. Don’t rely only on QuickConnect. If QuickConnect goes down, you’ll be locked out.
- QuickConnect setup sometimes fails. Mine kept looping. Fix for that is: update DSM first, then retry.
Packages That Broke
- Synology Photos worked out of the gate.
- Plex needed me to manually download the ARM package from Plex’s site, not the one inside Package Center.
- Docker isn’t supported on this model.
Remote Access
- Open ports on your router if you want to use Plex or external apps.
- Don’t expose DSM itself (5000/5001) to the internet. Use a VPN instead. Synology has their own VPN package, and works fine.
Backup Plan
Hyper Backup is your friend. Point it to a cloud service or another NAS. Don’t wait till a drive dies to care about this.
Hope you find this Synology DS225+ setup helpful and now you have connected your storage with the device and secured your files. For more assistance with your problems related to the Synology NAS, routers, or Beelines Device, you can fill the register form and get the solution on your mail Address, no spam, no worries.
Note: Storage disks are not included and need to be purchased separately.
Specifications
Key Features
- Synology DS225+
- 2-Bay Desktop NAS,
- Intel Celeron J4125
- 4-Core CPU,
What’s in the box
check image to confirm
Specifications
- SKU: SY438EA7L7NBRNAFAMZ
- Product Line: Blackgig
- Model: DXP4800 Plus
- Weight (kg): 0.5
- Color: black
- Main Material: aluminium steel chasis
- From the Manufacturer: nas
Verified Customer Feedback

Customers who have bought this product have not yet posted comments
Related results
Server routersEnergy server acCake serverHome serverAI softwareComputer serverAntivirus for serverCar scanner softwareNetwork power bankQuick book software for businessGames softwareNetwork scannerVocal mixing softwareNetwork MiFiDish serversPrint serverKaspersky serverWall mount networkNetwork cable 30 metersAnimation software 2025Wireless network adapterNetwork LAN tester and cable trackerServer switchesAutodesk CAD softwareWifi wireless network routerRJ45 network cardWired network card converterCat6 Network Cables 100%CopperNAS serverNetwork camera
/product/58/8919914/1.jpg?0058)
Synology NAS DS225+ Network storage server 2Bay Private Cloud Storage Built-in 2.5GbE Network port Diskstation RAID
₦ 890,000
Questions about this product?